
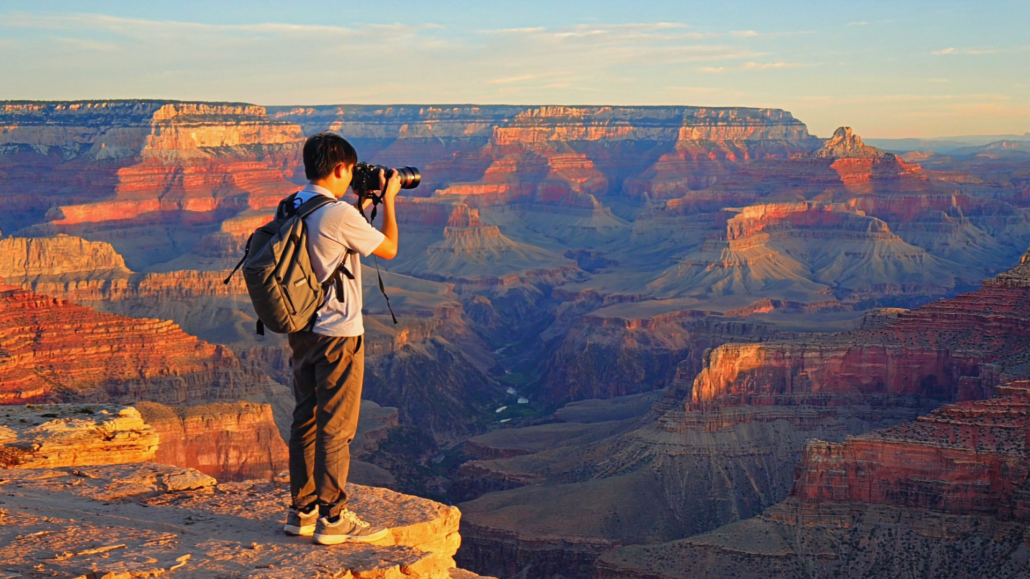
Grand Canyon Photography for Non-Professionals: How to Capture the Scale That Cameras Typically Lose
The Grand Canyon is one of the most photographed places on Earth, and yet nearly every visitor walks away with images that fail to capture what they actually saw. Not because they used the wrong camera, or forgot to charge the battery, or stood in the wrong spot. The problem runs deeper than gear: the canyon simply refuses to cooperate with the basic assumptions that cameras make about light, distance, and scale. Understanding why that happens, and what you can do about it, is the difference between a memory card full of disappointment and a set of images that genuinely communicate the experience.
This guide is written for non-professionals, meaning people who carry a smartphone, a mirrorless camera, or a basic DSLR, and who want better results without investing in a film degree or a $10,000 lens kit. The advice here applies across all major Grand Canyon photography spots along the South Rim, from the crowded overlooks near Grand Canyon Village to the quieter viewpoints accessible by shuttle or foot. It also addresses something most photography guides skip entirely: what to do before you reach the rim, including how a stop at Grand Canyon Visitor Center IMAX in Tusayan can actually sharpen your visual understanding of the canyon’s geology before you lift a camera.
Why the Grand Canyon Defeats Average Cameras (and Most Photographers)
Before diving into technique, it helps to understand the core problem. The Grand Canyon is not merely large. It is abstracted by its own size into something the human visual system handles differently than a camera sensor does. When you stand at the rim, your brain actively processes depth cues across a mile-wide, mile-deep landscape using stereoscopic vision, peripheral awareness, and constant micro-movements that create parallax. Your camera captures a flat rectangle. The result is predictable: the canyon looks like a painting of itself.
The Scale Problem Is Perceptual, Not Technical
Camera sensors, even excellent ones, record light on a flat plane. They cannot reproduce the binocular depth perception that makes a 277-mile-long canyon feel genuinely vast. When you look at the canyon with your own eyes, your brain is triangulating distance using the slight difference between what your left eye and right eye see. That process, called stereopsis, creates a powerful sensation of depth that no single-lens camera can replicate directly.
There are workarounds, and this guide covers them in detail, but the starting point is accepting that technical quality is not your enemy. A perfectly exposed, razor-sharp image of the Grand Canyon can still look flat and unconvincing. Conversely, a slightly underexposed shot taken at the right moment with the right compositional element in the foreground can hit harder than anything shot in ideal conditions. The canyon rewards strategic thinking more than technical perfection.
The Color Compression Problem
The Grand Canyon’s color palette spans roughly 270 layers of sedimentary rock laid down over nearly two billion years, according to the National Park Service’s geological overview. Those layers range from deep red Hakatai Shale to pale Kaibab Limestone, with dozens of sandstone, mudstone, and granite formations in between. In person, the contrast between those layers is immediately apparent. In a photograph taken in flat midday light, the entire palette compresses into a single orange-brown wash.
The reason is dynamic range. Human eyes can perceive an enormous contrast ratio simultaneously, adapting in real time to shadow and highlight. Camera sensors, even modern ones with impressive dynamic range specifications, capture a narrower slice of that contrast. When you photograph the canyon at noon in full sun, the highlights on the upper rim blow out and the shadows in the inner gorge go completely black, and everything in between muddles together. The color you remember seeing simply wasn’t recorded.
The Golden Hours: When the South Rim Transforms for Photography
The single most effective change any Grand Canyon photographer can make is adjusting what time they show up. Sunrise and the hour after, plus the 90 minutes before sunset and the 20 minutes after, produce light that solves multiple problems at once: it reduces harsh contrast, warms the color palette dramatically, rakes across geological layers to create visible texture, and casts long shadows that restore the sense of depth cameras normally lose.
Sunrise at the South Rim: What to Expect
South Rim sunrise is genuinely spectacular, but it requires planning. The most popular sunrise Grand Canyon scenic viewpoints, particularly Mather Point and Yavapai Point, fill up quickly. During peak summer months, photographers and general visitors begin arriving at these locations as early as 45 minutes before first light. Parking inside the park fills before dawn on busy days.
The practical solution: park in Tusayan, ride the free Tusayan shuttle into the park, and be at your chosen viewpoint at least 30 minutes before sunrise. The Tusayan shuttle system runs seasonally and eliminates the parking frustration that sends many visitors to the rim later than ideal, costing them the best light.
What happens photographically at sunrise is worth understanding in detail. As the sun clears the canyon’s eastern walls, it illuminates the upper formations first, leaving the inner gorge in cool shadow. This creates a natural gradient from warm orange at the top to deep blue-purple below, a contrast that cameras can actually render because the overall exposure range is moderate. The light then “pours” down the canyon walls over the following 20 to 30 minutes, and the shadows retreat in ways that reveal layer after layer of geological formation. If you shoot a burst of images during this window, you will see the canyon look completely different from frame to frame. This is the canyon’s most cooperative moment.
Sunset Strategy: Direction, Position, and the Afterglow
Sunset at the South Rim receives more attention than sunrise, partly because it requires no early wakeup, and partly because the light hits the canyon’s western-facing walls with extraordinary warmth. The challenge is that the most famous sunset viewpoints, particularly Hopi Point and Mohave Point along Hermit Road, are extremely crowded during peak season.
A less obvious strategy: position yourself facing east rather than west at sunset. While everyone else photographs the lit western walls, the eastern canyon takes on a softer, more diffused quality with rich shadow detail that actually photographs better than the overlit western face. Yavapai Point and Desert View both offer good eastward orientation during the final hour of light.
More importantly, do not leave when the sun sets. The 15 to 20 minutes after sunset, what photographers call the “blue hour,” produces some of the canyon’s most balanced light. The sky retains ambient glow, the canyon walls hold warmth, and the harsh contrast between lit and unlit areas softens into something a camera can actually record faithfully. Some of the most compelling Grand Canyon photography happens during this post-sunset window that the majority of visitors miss because they are already walking back to their cars.
Composition Techniques That Restore Depth and Scale
Composition is the most powerful tool a non-professional photographer has, and it costs nothing. The following techniques work on smartphones and professional cameras equally well, because they address the geometry of the image rather than the technical capabilities of the sensor.
The Human Scale Anchor
The most reliable way to restore a sense of scale in a Grand Canyon photograph is to include a person in the frame. This is not a creative cliché; it is a direct response to the perceptual problem described earlier. When a viewer’s brain sees a human figure at the canyon rim, it immediately has a reference point. The canyon then registers as genuinely enormous rather than as an abstract pattern of color and texture.
The key is placement. The person should not be centered and posed like a portrait subject. Position them at one edge of the frame, small relative to the canyon, ideally looking outward rather than at the camera. This creates a sense of the person being absorbed into the landscape rather than posing in front of it. The viewer follows their gaze into the canyon, which creates a visual journey that flat canyon shots cannot provide.
If you are photographing solo, use a tripod (or a stable rock surface) and a self-timer. Position yourself at the edge of the frame, look into the canyon, and let the landscape dominate the composition. The result will look more like a travel photograph than a selfie, and the scale will read correctly.
Leading Lines and Foreground Interest
The South Rim offers abundant compositional material that most visitors ignore because they are focused entirely on the canyon itself. The rim trail, for instance, creates a natural leading line that draws the eye from the foreground toward the canyon edge and then into the gorge. A section of trail curving toward a viewpoint, photographed with someone walking along it, creates depth through multiple visual planes: the trail, the rim, the canyon walls, and the far horizon.
Foreground elements, including rocks, vegetation, and rim features, serve a similar purpose. When you include a distinctive rock formation or a gnarled juniper tree in the immediate foreground, you create a visual anchor that establishes the viewer’s “position” within the scene. The middle ground (the canyon walls) and background (the North Rim or sky) then read as genuinely distant, because the viewer’s brain calculates their distance relative to the foreground object. This is the photographic equivalent of stereopsis: using spatial relationships within the frame to communicate depth.
Framing Within the Frame
Several Grand Canyon photography spots along the South Rim offer natural frames, including rock arches, overhanging ledges, and canyon overlook walls with openings. When you position the canyon view within one of these natural frames, you create a sense of looking through something, which the brain interprets as spatial depth. The frame occupies the near visual plane, the canyon occupies the far plane, and the distance between them reads clearly.
Shoshone Point (accessible via a roughly 2-mile round-trip walk from the East Rim Drive) offers excellent framing opportunities with its projecting peninsula-style viewpoint surrounded by forested terrain. Trailview Overlook, near Mather Point, provides rim wall features that can frame canyon views effectively when shooting from a slightly lower angle.
The Best Grand Canyon Photography Spots on the South Rim: A Practical Breakdown
Not all South Rim viewpoints photograph the same way. Each location has a specific character, optimal time of day, and compositional strengths. The following breakdown covers the primary photography locations along the South Rim with practical notes that go beyond “it’s beautiful.”
| Viewpoint | Best Time | Photographic Strength | Crowds | Access |
|---|---|---|---|---|
| Mather Point | Sunrise | Wide panoramic depth, classic canyon view, good eastern orientation | ⚠️ Very high | ✅ Easy, near Visitor Center Village |
| Yavapai Point | Sunrise / Blue hour | Geology museum nearby for context; excellent canyon depth; 270° views | ⚠️ High | ✅ Easy |
| Hopi Point | Sunset | Colorado River visible; dramatic western light; strong silhouette potential | ⚠️ Very high at sunset | ✅ Hermit Road shuttle |
| Desert View Watchtower | Late morning / Afternoon | Elevated shooting angle from tower; Colorado River bends; broader canyon width visible | ✅ Moderate | ✅ East Rim Drive, 25 mi from Village |
| Shoshone Point | Any time (permit required for events) | Projecting viewpoint surrounded by trees; minimal crowds; excellent foreground framing | ✅ Low | ⚠️ 1-mile walk from unpaved parking |
| Pima Point | Sunset | Colorado River audible and visible; quiet; good for long exposures after dark | ✅ Low to moderate | ✅ Hermit Road shuttle |
| Lipan Point | Sunrise / Late afternoon | Wide canyon panorama; Colorado River visible; East Rim solitude | ✅ Low | ⚠️ East Rim Drive, personal vehicle required |
Going Beyond the Overlooks: Photography on the Best Hikes Grand Canyon South Rim Has to Offer
Rim-level overlooks give you one angle: looking horizontally across the canyon. The best hikes on the Grand Canyon South Rim give you something fundamentally different, a perspective that looks back up at the rim from inside the canyon, with layer-by-layer geological context and foreground detail that no rim viewpoint can provide.
The Bright Angel Trail is the most accessible option for non-hikers attempting canyon-depth photography. Even a 1.5-mile descent to the first rest house produces dramatically different photographic opportunities: you can look up at the Kaibab Limestone rim, down at the Tonto Platform, and see multiple geological layers simultaneously in a way that communicates the canyon’s vertical scale more clearly than any rim shot. The switchbacks themselves create strong compositional leading lines, and the canyon walls on either side provide natural framing.
The South Kaibab Trail offers something Bright Angel cannot: exposed ridgeline walking with 360-degree canyon views. The Ooh Aah Point viewpoint, roughly 0.9 miles from the trailhead, sits on a projecting ridge with canyon dropping away on multiple sides simultaneously. This is one of the few South Rim locations where a wide-angle lens can capture genuine spatial surround rather than a flat panoramic slice. Shoot early on South Kaibab: the exposed ridgeline gets direct sun quickly and the midday light is harsh with no shade.
For photographers comfortable with more demanding terrain, the Grandview Trail to Horseshoe Mesa (a roughly 6-mile round trip) delivers a completely different canyon character, with rust-red Redwall Limestone formations and the ruins of an old copper mining operation providing historical foreground elements that add narrative depth to landscape images.
Camera Settings and Gear That Actually Matter for Non-Professionals
Gear matters less than most photography articles suggest, but a few specific settings and tools make a significant difference in canyon photography specifically. This section focuses on practical adjustments that non-professionals can make immediately, without purchasing anything new.
Exposure: Protecting the Highlights
The most common technical mistake at the canyon is exposing for the shadowed areas, which blows out the sky and upper rim. The counterintuitive solution: expose for the brightest part of the scene and let the shadows go slightly dark. In post-processing (even on a smartphone), shadows are far easier to recover than blown highlights. Modern phone cameras and mirrorless cameras can recover two to three stops of shadow detail; blown highlights are usually unrecoverable.
On a smartphone, tap the brightest canyon wall in the frame to set exposure to that area. The shadows will darken, but the overall image will retain far more detail across the frame. On cameras with manual or semi-manual controls, use spot or center-weighted metering aimed at the lit canyon walls, not the sky and not the shadow areas.
HDR: Use It Carefully
Smartphone HDR modes and camera bracketing merge multiple exposures to handle the canyon’s contrast range. The problem is that automatic HDR processing often produces a flat, “painted” look that actually makes the canyon look less real, not more. If you use HDR, look for a setting that applies it subtly rather than aggressively. On iPhones, “Smart HDR” is generally conservative enough. On Android devices, HDR+ or similar modes vary by manufacturer; test against a non-HDR shot and compare.
Manual HDR bracketing (shooting three frames at different exposures and blending in Lightroom or Photoshop) gives you far more control. But for non-professionals who don’t use photo editing software regularly, a single well-exposed RAW file (if your camera or phone supports it) with careful shadow/highlight adjustment in post is usually a better result than aggressive auto-HDR.
The Polarizing Filter: Underused and Highly Effective
A circular polarizing filter is the single piece of additional gear most likely to improve Grand Canyon photography. When rotated correctly, it reduces atmospheric haze (the pale blue-white veil that desaturates distant canyon walls), increases color saturation in the rock layers, and darkens blue sky without affecting the warm tones of the canyon itself. The effect cannot be fully replicated in post-processing because polarization affects the physics of how light enters the lens, not just the tonal values of the recorded image.
Polarizing filters are available for mirrorless and DSLR cameras in standard thread sizes, and clip-on versions exist for smartphones. They work best when shooting at a roughly 90-degree angle to the sun, which means they are most effective in the mid-morning and mid-afternoon when the sun is to your side rather than directly in front or behind you. At sunrise and sunset when the sun is near the horizon, the effect is less pronounced but still useful for haze reduction.
Tripod Use and When It Actually Helps
A tripod is not essential for daytime Grand Canyon photography. In good light, image stabilization in modern cameras and phones handles handheld shooting well. However, tripods become genuinely valuable in three specific situations: blue hour and twilight shooting, when exposure times exceed 1/30 second; night and astrophotography, when the canyon’s depth under a starlit sky produces extraordinary images; and panoramic shooting, where keeping the camera perfectly level across multiple frames is critical for clean stitching.
A compact travel tripod (carbon fiber models pack small and weigh under 2 pounds) covers all three use cases without adding significant pack weight. If a tripod feels excessive, a small gorilla-style flexible tripod can be positioned on rim rocks and provides enough stability for twilight shots.
Smartphone Photography at the Grand Canyon: Specific Techniques That Work
Smartphone cameras are now capable of producing genuinely impressive Grand Canyon images, but they require a different set of techniques than dedicated cameras. The computational photography that makes modern phones impressive in everyday situations can actually work against you at the canyon if you don’t know how to manage it.
Disable Live HDR and Computational Processing During Golden Hour
During sunrise and sunset, the warm light already handles much of the work that computational HDR is designed to do. When phones apply aggressive HDR processing to a golden-hour scene, they often cool the image (reducing that warmth to “balance” the exposure) and flatten the shadows in ways that reduce rather than increase visual impact. On iPhone, this can be managed by shooting in ProRAW mode if available, or by using the manual controls in the native camera to lock exposure and white balance. On Android, similar manual control is available in Pro mode on most flagship devices.
Panoramas: The One Mode Designed for This Scale
Smartphone panorama modes are genuinely useful at the Grand Canyon because they address the scale problem directly. A panorama shot from the South Rim can capture 180 degrees of canyon width in a single image, communicating the horizontal extent that a standard frame cannot. The keys to a clean panorama: move very slowly during the sweep, keep the horizon line level (use the guide overlay on the phone screen), and shoot in calm conditions since movement in the foreground during the sweep creates “ghosting” artifacts.
For printing or large-format display, panoramas shot on modern flagship smartphones contain enough resolution for prints up to 24×48 inches without significant quality loss, making them one of the few phone photography use cases where the output genuinely competes with dedicated camera results.
Night Photography on a Phone: What’s Realistic
Modern phones with dedicated Night Mode can capture the canyon under stars with impressive results, but with important caveats. Phone night modes typically use 3-to-10-second exposures, which means any movement during capture, including wind-blown vegetation in the foreground, will blur. The canyon itself is stationary, so the main challenge is keeping the phone completely still, which requires a tripod or a very stable surface.
Astrophotography at the Grand Canyon is rewarding because the park has relatively low light pollution and the canyon’s depth creates a dramatic foreground for star trail images. The best positions for night photography are away from Grand Canyon Village’s ambient lighting, with Desert View and Lipan Point on the East Rim offering darker skies than the central South Rim area.
Understanding What You’re Photographing: Geology as a Photography Tool
Knowing what you are looking at changes what you choose to photograph, and that knowledge produces better images. This is not about memorizing geological terminology; it is about understanding which formations catch light differently, which layers create the most visual contrast, and why the canyon looks radically different from hour to hour.
The Layer Cake: Reading the Canyon’s Color Bands
The Grand Canyon’s walls are essentially a color-coded timeline, with each sedimentary layer representing a distinct geological period, environment, and mineral composition. The pale gray-white at the very top is Kaibab Limestone, formed from a shallow sea roughly 270 million years ago. Below it, the slightly warmer Toroweap Formation and Coconino Sandstone create a band of cream and buff. The Hermit Formation below that is a distinctive deep red. Further down, the Supai Group layers stack in alternating red and orange, and the Redwall Limestone (which actually appears reddish due to iron oxide staining from the layers above) creates a dramatic vertical cliff face.
For photographers, the practical implication is this: the canyon’s color contrast is highest in the first and last hour of sunlight, when raking light emphasizes the texture differences between layers. At noon, all those layers flatten into a single orange wash. At sunrise, the Kaibab cap catches warm light first while the Redwall below remains in shadow, and the contrast between them is as stark and readable as anything in landscape photography. This geological understanding directly informs when to shoot and where to point the camera.
Why the Canyon Looks Different Every Season
The canyon’s appearance changes substantially across seasons, and those changes create different photographic opportunities. Winter snow on the South Rim, which occurs regularly between November and March, creates extraordinary contrast between the white rim and the warm-colored canyon walls below. The snow line typically stops at the rim, leaving the inner canyon bare, which means a winter photograph can include snow in the immediate foreground and warm desert tones at depth simultaneously.
Monsoon season (roughly July through September) brings afternoon thunderstorms that can produce dramatic cloudscapes above the canyon, shafts of light breaking through storm clouds, and occasional waterfalls cascading down canyon walls that are completely dry in other seasons. The light on the day after a monsoon storm, when the air has been cleaned of dust and haze, produces some of the clearest long-distance views of the year.
Autumn brings subtle color changes to the canyon’s rim vegetation, with aspens turning gold at higher elevations and the Bright Angel trailhead area gaining warm amber tones. The angle of autumn light is lower than summer, which means golden-hour windows are longer and more usable than during midsummer’s steep sun angles.
Starting With the Full Picture: The IMAX Advantage Before You Shoot
There is a genuine photography argument for stopping at Grand Canyon Visitor Center IMAX in Tusayan before entering the park. Located just outside the South Rim entrance, the facility screens “Grand Canyon: Rivers of Time” on a six-story IMAX screen using IMAX with Laser technology, a film that covers the canyon’s geological and cultural history with aerial and ground-level footage that most visitors will never be able to access through personal photography.
What this does for your photography is specific and practical: it gives you a mental map of the canyon’s geography before you stand at the rim. Visitors who have seen the film understand which features they are looking at from different viewpoints, which Colorado River bends appear in which overlook views, and how the inner gorge relates to the outer canyon walls. That spatial understanding directly influences composition decisions. Rather than pointing a camera at “the canyon” in general, a photographer who has seen the IMAX film can identify specific features, foreground them intentionally, and construct images with narrative clarity.
The film also provides visual reference for the canyon’s aerial character, something no rim-level photograph can capture but that contextualizes everything you shoot from ground level. Book IMAX online and save on admission, making it an easy add to any South Rim photography trip, especially for first-time visitors who benefit most from orientation before exploration.
Pink Jeep Tours, which operates from the Grand Canyon Visitor Center IMAX facility with departures directly from the front door, offers another photography advantage: guided access to viewpoints and canyon areas that independent visitors often miss, with tour leaders who can indicate optimal shooting positions and timing. Every Pink Jeep Tour originating from Grand Canyon Visitor Center IMAX includes a ticket to “Grand Canyon: Rivers of Time,” making the combination of film and guided tour a genuinely useful photography prep package.
Post-Processing for Non-Professionals: Recovering What the Camera Missed
Post-processing is not cheating; it is completing the photographic process. Film photographers spent hours in darkrooms adjusting exposure, contrast, and color. Digital photography simply moves those adjustments to a screen. For Grand Canyon images specifically, a few targeted adjustments can recover most of the color and depth that cameras compress during capture.
The Three Adjustments That Matter Most
First, shadows and highlights. In Lightroom, Snapseed, or even the basic iPhone Photos editor, pulling the Highlights slider down and the Shadows slider up simultaneously recovers detail in both the bright rim and the dark inner gorge. This single adjustment, applied correctly, can transform a flat midday shot into something with genuine tonal range. The adjustment works best on RAW files but produces useful results even on JPEGs.
Second, texture and clarity. The Grand Canyon’s geological detail, the individual rock faces, erosion patterns, and layer boundaries, is often present in the raw capture but visually muted. The Texture slider in Lightroom (and equivalents in other apps) brings out fine detail without the harsh edge-enhancing effect of older Sharpness tools. Applying +20 to +35 texture to canyon wall areas specifically (using a brush or radial filter rather than globally) can restore the sense of geological complexity that the eye sees but the camera compresses.
Third, vibrance over saturation. The canyon’s color palette includes both highly saturated reds and more muted blues and greens. The Saturation slider boosts all colors equally, which often turns the red canyon walls into an unnatural neon orange while also oversaturating the sky. The Vibrance slider boosts less-saturated colors preferentially while protecting already-saturated tones, producing a more balanced result that looks like what you actually saw rather than a postcard filter.
When to Use Graduated Filters
Graduated neutral density filters, either physical (for camera lenses) or digital (in post-processing), address the sky-versus-canyon exposure problem by darkening the sky separately from the canyon. In Lightroom, a linear gradient applied from the top of the frame down, with the Exposure slider reduced by 1 to 1.5 stops, can balance a blown-out sky against a correctly exposed canyon floor in a single adjustment. This is the digital equivalent of the physical GND filters that landscape photographers use in the field, and it is one of the most useful post-processing tools for canyon photography specifically.
Grand Canyon Photography Travel Guide: Planning Your Trip Around the Light
A complete Grand Canyon travel guide for photographers needs to address logistics as much as technique, because the best photographic opportunities at the South Rim are time-sensitive and require specific positioning that general trip planning does not always prioritize.
Two-Day Photography Itinerary for the South Rim
Day One: East Rim and Village Area
Arrive in Tusayan the evening before. Stop at Grand Canyon Visitor Center IMAX to orient yourself with the IMAX film and pick up any needed National Park entrance passes (sold on-site, avoiding the entrance gate queues). Check gear and plan your sunrise location. Wake before dawn and use the Tusayan shuttle or park early for sunrise at Mather Point or Yavapai Point. Spend the morning exploring the Rim Trail between Mather and Yavapai, shooting the canyon as the light changes from early to mid-morning. Drive the East Rim Drive to Lipan Point and Desert View in the late morning, arriving at Desert View Watchtower for elevated shooting angles in the better midday and early-afternoon light. Return to the Village area for the final two hours before sunset, positioning at Hopi or Mohave Point via the Hermit Road shuttle. Stay through blue hour. This produces a complete range of light conditions across a single day.
Day Two: Trails and Interior Perspectives
Begin early on the South Kaibab Trail to Ooh Aah Point for a ridgeline sunrise perspective that no rim viewpoint can replicate. Return by mid-morning and spend time on the Bright Angel Trail for canyon-interior photography, descending at minimum to the 1.5-Mile Rest House. Afternoon can be used for Shoshone Point (the 1-mile walk from the unpaved trailhead access road), which offers a peaceful, crowd-free viewpoint for afternoon and pre-sunset shooting. End with sunset at Pima Point via the Hermit Road shuttle, where the Colorado River is audible and visible and the crowds are thinner than at Hopi Point. Stay for night photography if conditions permit.
Seasonal Logistics at a Glance
| Season | Light Quality | Crowd Level | Photography Advantage | Key Consideration |
|---|---|---|---|---|
| Spring (Mar–May) | ✅ Excellent | ⚠️ Moderate-High | Clear air, manageable sunrise times, wildflowers on rim | Spring break crowds in late March/April |
| Summer (Jun–Aug) | ⚠️ Challenging midday | ❌ Peak crowds | Monsoon cloudscapes, early sunrise (~5:30 AM), post-storm clarity | Extreme midday heat, parking scarcity, shuttles required |
| Fall (Sep–Nov) | ✅ Outstanding | ✅ Moderate | Low-angle light, longer golden hours, autumn rim color, clear air | Some facilities begin reduced hours after Labor Day |
| Winter (Dec–Feb) | ✅ Dramatic | ✅ Low | Snow contrast, low crowds, late sunrise manageable, unique atmospherics | Some roads and facilities closed; ice on trails |
Frequently Asked Questions About Grand Canyon Photography
What is the single best Grand Canyon photography spot for a first-time visitor?
Mather Point at sunrise is the most reliable starting point. It offers a wide, deep canyon view with eastern orientation that catches the first light beautifully. It is close to the NPS Visitor Center inside the park, accessible via the Tusayan shuttle, and provides enough compositional variety for both wide shots and detail work. If crowds are heavy, walk 10 minutes west along the Rim Trail to Yavapai Point for more space and nearly identical light quality.
Can smartphones really take good Grand Canyon photos?
Yes, with the right technique. Modern flagship smartphones, including current iPhone and Samsung Galaxy models, produce excellent canyon images when used during golden hour, composed with foreground elements, and processed with shadow/highlight recovery afterward. The key limitations are zoom quality (digital zoom degrades quickly) and low-light performance below what a tripod-stabilized mirrorless camera can achieve. For daytime photography, the gap between smartphone and dedicated camera has narrowed dramatically.
Is a wide-angle or telephoto lens better for the Grand Canyon?
Wide-angle for immersion and scale; telephoto for geological detail and compression effects. A wide-angle lens (roughly 16–24mm equivalent) captures the spatial sweep of the canyon and is ideal for foreground-focused compositions. A telephoto (100–400mm equivalent) compresses distance, stacking canyon layers visually and isolating specific formations or the Colorado River from the rim. Both are useful. If you carry only one lens, a wide-angle is the more versatile choice for rim photography; a telephoto becomes essential if you want to photograph details at depth.
What time should I arrive at Hopi Point for sunset?
Aim to be at Hopi Point at least 90 minutes before sunset, especially in summer and on weekends. The Hermit Road shuttle can be slow during peak periods, and the viewpoint fills quickly. Arriving early lets you claim a position, scout the composition, and shoot the evolving light rather than rushing to find a spot as the sun drops. If you arrive and Hopi is too crowded, Mohave Point (one stop back on the shuttle) offers similar western exposure with typically fewer people.
Are tripods allowed at the Grand Canyon?
Tripods are permitted at the Grand Canyon for personal, non-commercial photography without a special permit. Commercial photography and videography require a permit from the National Park Service. Keep tripods clear of foot traffic on the Rim Trail and at overlooks, particularly during peak hours when viewpoints are crowded. For commercial shoots, check the NPS filming and photography permit page for current requirements.
How do I photograph the Colorado River from the South Rim?
The Colorado River is not visible from every South Rim viewpoint. The best locations for river views are Hopi Point, Mohave Point, Pima Point, Lipan Point, and Desert View. Use a telephoto lens or zoom setting for river photography from the rim, as the river is roughly a mile below and a mile away. The clearest views typically occur in morning light from Lipan Point and at sunset from Hopi Point. The South Kaibab Trail to Ooh Aah Point provides a slightly closer perspective than most rim viewpoints.
Does the Grand Canyon IMAX film help with photography?
More than most visitors expect. The “Grand Canyon: Rivers of Time” film at Grand Canyon IMAX Theater in Tusayan includes aerial footage that shows the canyon’s full geographic extent, the Colorado River’s course through the canyon, and geological features that are difficult to identify from ground level. Watching the film before your rim visit gives you a spatial map of what you are photographing, which directly improves compositional decisions. You will recognize specific formations, understand which viewpoints face which canyon sections, and have a clearer sense of what to prioritize with your camera time.
What are the best Grand Canyon photography tips for rainy or overcast conditions?
Overcast days diffuse harsh sunlight and actually reduce the contrast problem that causes flat canyon images. The result is more evenly lit canyon walls with better shadow detail than you get on clear midday days. Shoot in RAW if possible, which retains more color information in flat light. Overcast days are also ideal for waterfall photography if recent rain has activated seasonal falls. The most dramatic overcast opportunity is a partially cloudy day with shafts of light breaking through the cloud cover, which creates spotlight effects on specific canyon sections that change minute by minute.
How should I photograph the canyon in winter with snow?
Winter snow photography at the Grand Canyon is one of the most rewarding conditions available. Expose for the snow in the foreground (which will be the brightest element), and let the warmer canyon tones hold their natural exposure below. Shooting in RAW is particularly important in snow conditions because the camera’s meter will attempt to turn the white snow gray. Apply positive exposure compensation of +1 to +1.5 stops if shooting in auto-exposure modes. The contrast between white snow and red canyon walls is highest in the first hour after snowfall, before foot traffic disturbs the rim snow.
What Grand Canyon scenic viewpoints are least crowded for photography?
Shoshone Point, Lipan Point, Pima Point, and the Grandview Trail area consistently offer fewer crowds than the central South Rim viewpoints. On the Hermit Road, points beyond Hopi (Mohave, Pima, Hermits Rest) thin out progressively. The East Rim Drive viewpoints, particularly Navajo Point and Lipan Point, require a personal vehicle but attract a fraction of the visitors that Mather and Yavapai see on busy days. Early morning visits to any viewpoint, even popular ones, substantially reduce crowd interference.
Is it worth doing a guided jeep tour for photography?
Guided tours offer access to viewpoints and road-accessible locations that independent visitors often overlook, plus a guide who knows the timing and positioning for best light at each stop. Pink Jeep Tours departing from Grand Canyon Visitor Center IMAX in Tusayan cover a range of South Rim and surrounding area options, with the added benefit of a “Rivers of Time” IMAX ticket included with every tour originating from the facility. For photographers unfamiliar with the South Rim geography, a guided first visit followed by independent exploration on a second day is an efficient way to maximize both orientation and creative freedom.
Can I photograph wildlife at the Grand Canyon?
California condors, mule deer, elk, and numerous smaller species are regularly seen along the South Rim. For wildlife photography, a telephoto lens (200mm or longer equivalent) is necessary from safe distances. Wildlife viewing at the Grand Canyon requires staying at least 100 feet from most wildlife, per NPS guidelines. Condors are frequently spotted soaring at rim level near Mather Point and along the South Kaibab Trail, making those locations worth extended time for wildlife photographers. Dawn and dusk are the most active periods for most species.
Key Takeaways
- Time of day is the most important variable in Grand Canyon photography, more important than camera gear or technical settings. Sunrise and the 90 minutes before sunset produce light that solves multiple problems simultaneously.
- Scale is restored through composition, not equipment. Including a human figure, using foreground elements, and shooting from trail perspectives rather than exclusively from rim overlooks communicates the canyon’s true size in ways that gear upgrades cannot.
- Expose for the highlights. Let shadows go dark and recover them in post-processing. Blown highlights are unrecoverable. This single adjustment eliminates the most common technical problem in canyon photography.
- The best Grand Canyon photography spots are not necessarily the most popular ones. Shoshone Point, Lipan Point, and the South Kaibab ridgeline offer compelling compositional advantages with significantly fewer crowds than Mather or Hopi Point.
- A polarizing filter is the most effective single gear addition for non-professional canyon photographers, reducing atmospheric haze and increasing color depth in ways post-processing cannot fully replicate.
- Understanding geology improves photography. Knowing which formations catch light at what times, and why the canyon’s color palette changes through the day, transforms passive shooting into intentional image-making.
- Start at Grand Canyon Visitor Center IMAX before entering the park. The “Grand Canyon: Rivers of Time” film on a six-story IMAX screen provides aerial and geological context that sharpens every compositional decision you make once you reach the rim. Book IMAX online and save on admission.
- Fall and winter are the most underrated seasons for photography, offering lower-angle light, longer golden hours, reduced crowds, and unique conditions like snow contrast and post-monsoon clarity that summer visits cannot provide.

About the author
Explore The Canyon Editorial Team
See The Canyon
Learn more →

